Looking for Inspiration?
Getting Started
Are you ready to start creating with polymer clay? With your Polymer Clay DIY Kit in hand and some good music you are ready for a fun time creating unique designs. Here’s what you will need to get started:
- Make sure you have a clean, flat surface to work on (a silicone mat, parchment paper, or a ceramic tile works well).
- Keep a few basic tools on hand, such as a roller, cutting blade, and shaping tools (a toothpick, plastic knife, or even your fingers will work).
- Remove the protective plastic from the roller and acrylic plate.
- Keep unused clay in the resealable bag to prevent it from drying out.
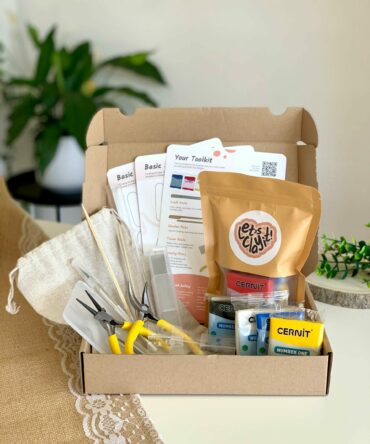
Do you want to get started with polymer clay but don’t have the materials yet? The Polymer Clay DIY Kit is the perfect way to start creating with polymer clay.
The kit includes all the basic tools to start crafting plus high quality polymer clay, step-by-step printed guide and even some cool jewelry shape templates you can use when crafting your own clay creations.

How to Condition Polymer Clay
Take a small piece of clay and warm it up in your hands by kneading and rolling it until it becomes soft and pliable. If the clay is too hard, you can use a bit of baby oil or a clay softener to make it more malleable.
If you are using a small quantity of clay you can condition it just by kneading it with your fingers. If however you need to use a larger quantity of clay, you use the roller to condition the clay. Simply roll the clay until getting it to a slab around 2mm think, fold it in two and the roll it again from the fold to the open side to avoid air bubbles. Repeat this process until the sides are smooth looking.
This process can be made easier also with a pasta machine, if you have one. Just keep in mind to always roll from the fold to the tips.
How to Shape the Clay
Begin by rolling, pinching, and molding the clay into your desired form. The versatility of polymer clay lets you craft a variety of items. Whether you’re aiming to create elegant beads, detailed figurines, stylish jewelry, or anything else, the sky’s the limit. Let your imagination guide you, and tap into your creativity!
Occasionally, polymer clay might become overly soft or sticky, especially in warm conditions. If this happens, there’s a simple fix to avoid a mess: fold a piece of parchment paper in half and place your clay in between the sheets. Now, when you roll or press the clay, it won’t stick to the roller or your hands.
Clay cutters are fantastic tools, but sometimes the clay might adhere to them. To prevent this, you can:
- Use corn starch: lightly dust the cutter with corn starch. This acts as a barrier, preventing the clay from sticking. Remember to tap off excess corn starch before cutting. If there is some corn starch left on the clay after cutting simply brush it away gently with a makeup brush.
- Use water: wet the cutter’s edge slightly. The water creates a temporary non-stick layer between the cutter and clay.
- Use plastic wrap: place a layer of plastic wrap or cling film over your clay before using the cutter. This not only prevents sticking but also gives a rounded, smooth edge to your cut-out shapes.
Joining Clay Pieces
To create a unified piece or add details, sometimes you’ll need to join different clay sections. To achieve a strong bond:
- Bond different pieces by simply pressing the two clay pieces together with firm pressure. Ensure the surfaces to be joined are free of dust or lint for a better bond.
- Use liquid polymer clay for an even stronger connection. Simply apply a small amount of liquid polymer clay to one of the surfaces before pressing them together. It acts as a glue and further ensures the bond remains intact during and after baking.
When two clay pieces are joined, a seam might be visible. You can always smooth out the seams by gently rubbing the area with your finger or a little bit of corn starch on the tip of your finger.
Color Mixing with Polymer Clay
Mixing colors is one of the most rewarding aspects of working with polymer clay, allowing you to achieve custom shades and gradients. Here are a few tips to blend colors effectively:
- Starting Ratios: begin by determining how much of each color you want. For a more controlled blend, use simple ratios like 1:1 or 2:1 to start.
- Kneading Together: take the chosen colors and knead them together, stretching and folding repeatedly. The more you work the clay, the smoother and more consistent the blend will become.
- Checking Progress: periodically, roll out a small piece to check the color. Remember, colors may slightly change when baked, often becoming a bit darker.
- Adding Depth: to add depth or brightness, consider incorporating small amounts of white or black clay.
- Note on Pastels: lighter pastel shades can be achieved by adding more white to your blend.
By mastering color mixing, you’ll be able to expand your palette and give your creations a unique touch.
Adding Texture and Detail to Your Clay
The beauty of polymer clay is its ability to capture intricate details, allowing you to enhance the uniqueness of your project. Here are a few ways to add texture and detail to your creations:
- DIY Texturing Tools: simple household items can become texturing tools. Consider using a toothpick for fine lines, a needle for delicate dots, sandpaper for a rough texture, or even a toothbrush to achieve a stippled effect.
- Pattern Imprints: for more intricate patterns, items like rubber stamps or lace can be pressed onto the clay surface. By pressing these textured surfaces into your clay, you can achieve beautiful, detailed imprints. Remember to gently remove the item to preserve the pattern.
Experiment with different tools and materials to find what textures and details appeal to you most.
Preparing Your Project for Baking
Before taking your creation to the oven, some preparatory steps are crucial for a polished result.
- Trimming Excess Clay: cutting away extra clay before baking helps you achieve cleaner edges and reduces the time you’ll spend sanding afterwards. A craft knife is excellent for this purpose.
- Embedding Stud Posts: if you’re making stud earrings, embed the metal stud posts into your clay before baking to make the process easier and the posts more secure. Envelop the larger part of the stud with clay and then smooth out the area. This ensures a seamless integration of the metal and clay, and a more secure final product.
- Creating Holes for Jump Rings: if you are creating designs that need to be connected by jump rings, pre-make these holes using a toothpick. Doing this prior to baking makes the post-bake assembly more straightforward.
These preparatory steps help ensure that your polymer clay project is oven-ready and will result in a polished, professional-looking creation.
Baking Polymer Clay
Polymer clay is non-toxic and can be baked on the conventional kitchen oven or mini-oven. It’s best however to not use trays or surfaces that are used with food when baking polymer clay. And do not bake polymer clay on a microwave. Here are the important steps when baking polymer clay:
- Preheating the Oven: always start by preheating your oven to the temperature specified on your clay’s packaging. A properly heated oven ensures even curing of your project.
- Preparing the Baking Surface: line a baking sheet with parchment paper or a silicone baking mat. Alternatively, you can use a ceramic tile as a base for your clay pieces. These surfaces prevent sticking and allow for easy removal after baking.
- Baking Time: adhere to the time recommendation on your clay packaging. During baking, it’s essential to periodically check your items to prevent them from over-baking or burning.
- Post-Baking: After the baking time is up, remove your project from the oven. Allow it to cool completely on the baking sheet or tile before handling to ensure it has set properly.
By carefully following these baking steps, you’ll ensure the quality and longevity of your polymer clay project.
Finishing Touches After Baking
Your polymer clay creation is almost complete. Here are a few more tips that may be helpful:
- Sanding: if you find rough or uneven edges on your baked pieces, a touch of fine sandpaper can smooth things out. Sand gently in a circular motion to avoid gouging the material.
- Adding Effects and Protection: painting, varnishing, or glazing your project can offer both aesthetic enhancements and additional protection. It’s crucial to choose products that are compatible with polymer clay to ensure a long-lasting finish.
Now you can enjoy you polymer clay creations or start the process again to make new designs and try different methods and techniques.


