The Maker’s box Starfish edition has everything you need to make these full of summer vibes earrings. Well, almost everything. You will need also something refreshing to drink, a nice place to create your amazing pieces of art and jewelry pliers to make the assembling process easier. But if you don’t have pliers (and don’t want to get some affordable ones on Amazon), I have opened and close jump rings with anything from normal pliers, to only using the strength of my own fingers. And I know you are resourceful and will manage it as well. Se let’s get into it!
What you will need
The Maker’s Box already contains pretty much everything you need, but a few more things will be quite useful in the process:
- Wet wipes to clean tools, surfaces and your hands
- A tile or tray with baking paper to take the pieces to the oven
- Jewelry pliers for the assembling part
Here are the things included in your Maker’s Box:
- 3x Fimo Soft packages (White, Caramel and Emerald)
- 1x starfish silicone mould
- 4x wooden sticks
- 4x silver hooks
- 8x steel posts
- 28x jump rings (in different sizes)
- Corn starch
- Tissue paper
- Sizing reference sheet
- Color recipes and reference photos
- 1x acrylic plate
- 1x fabric bag with
Don’t have a Maker’s Box yet? Click here to get yours.
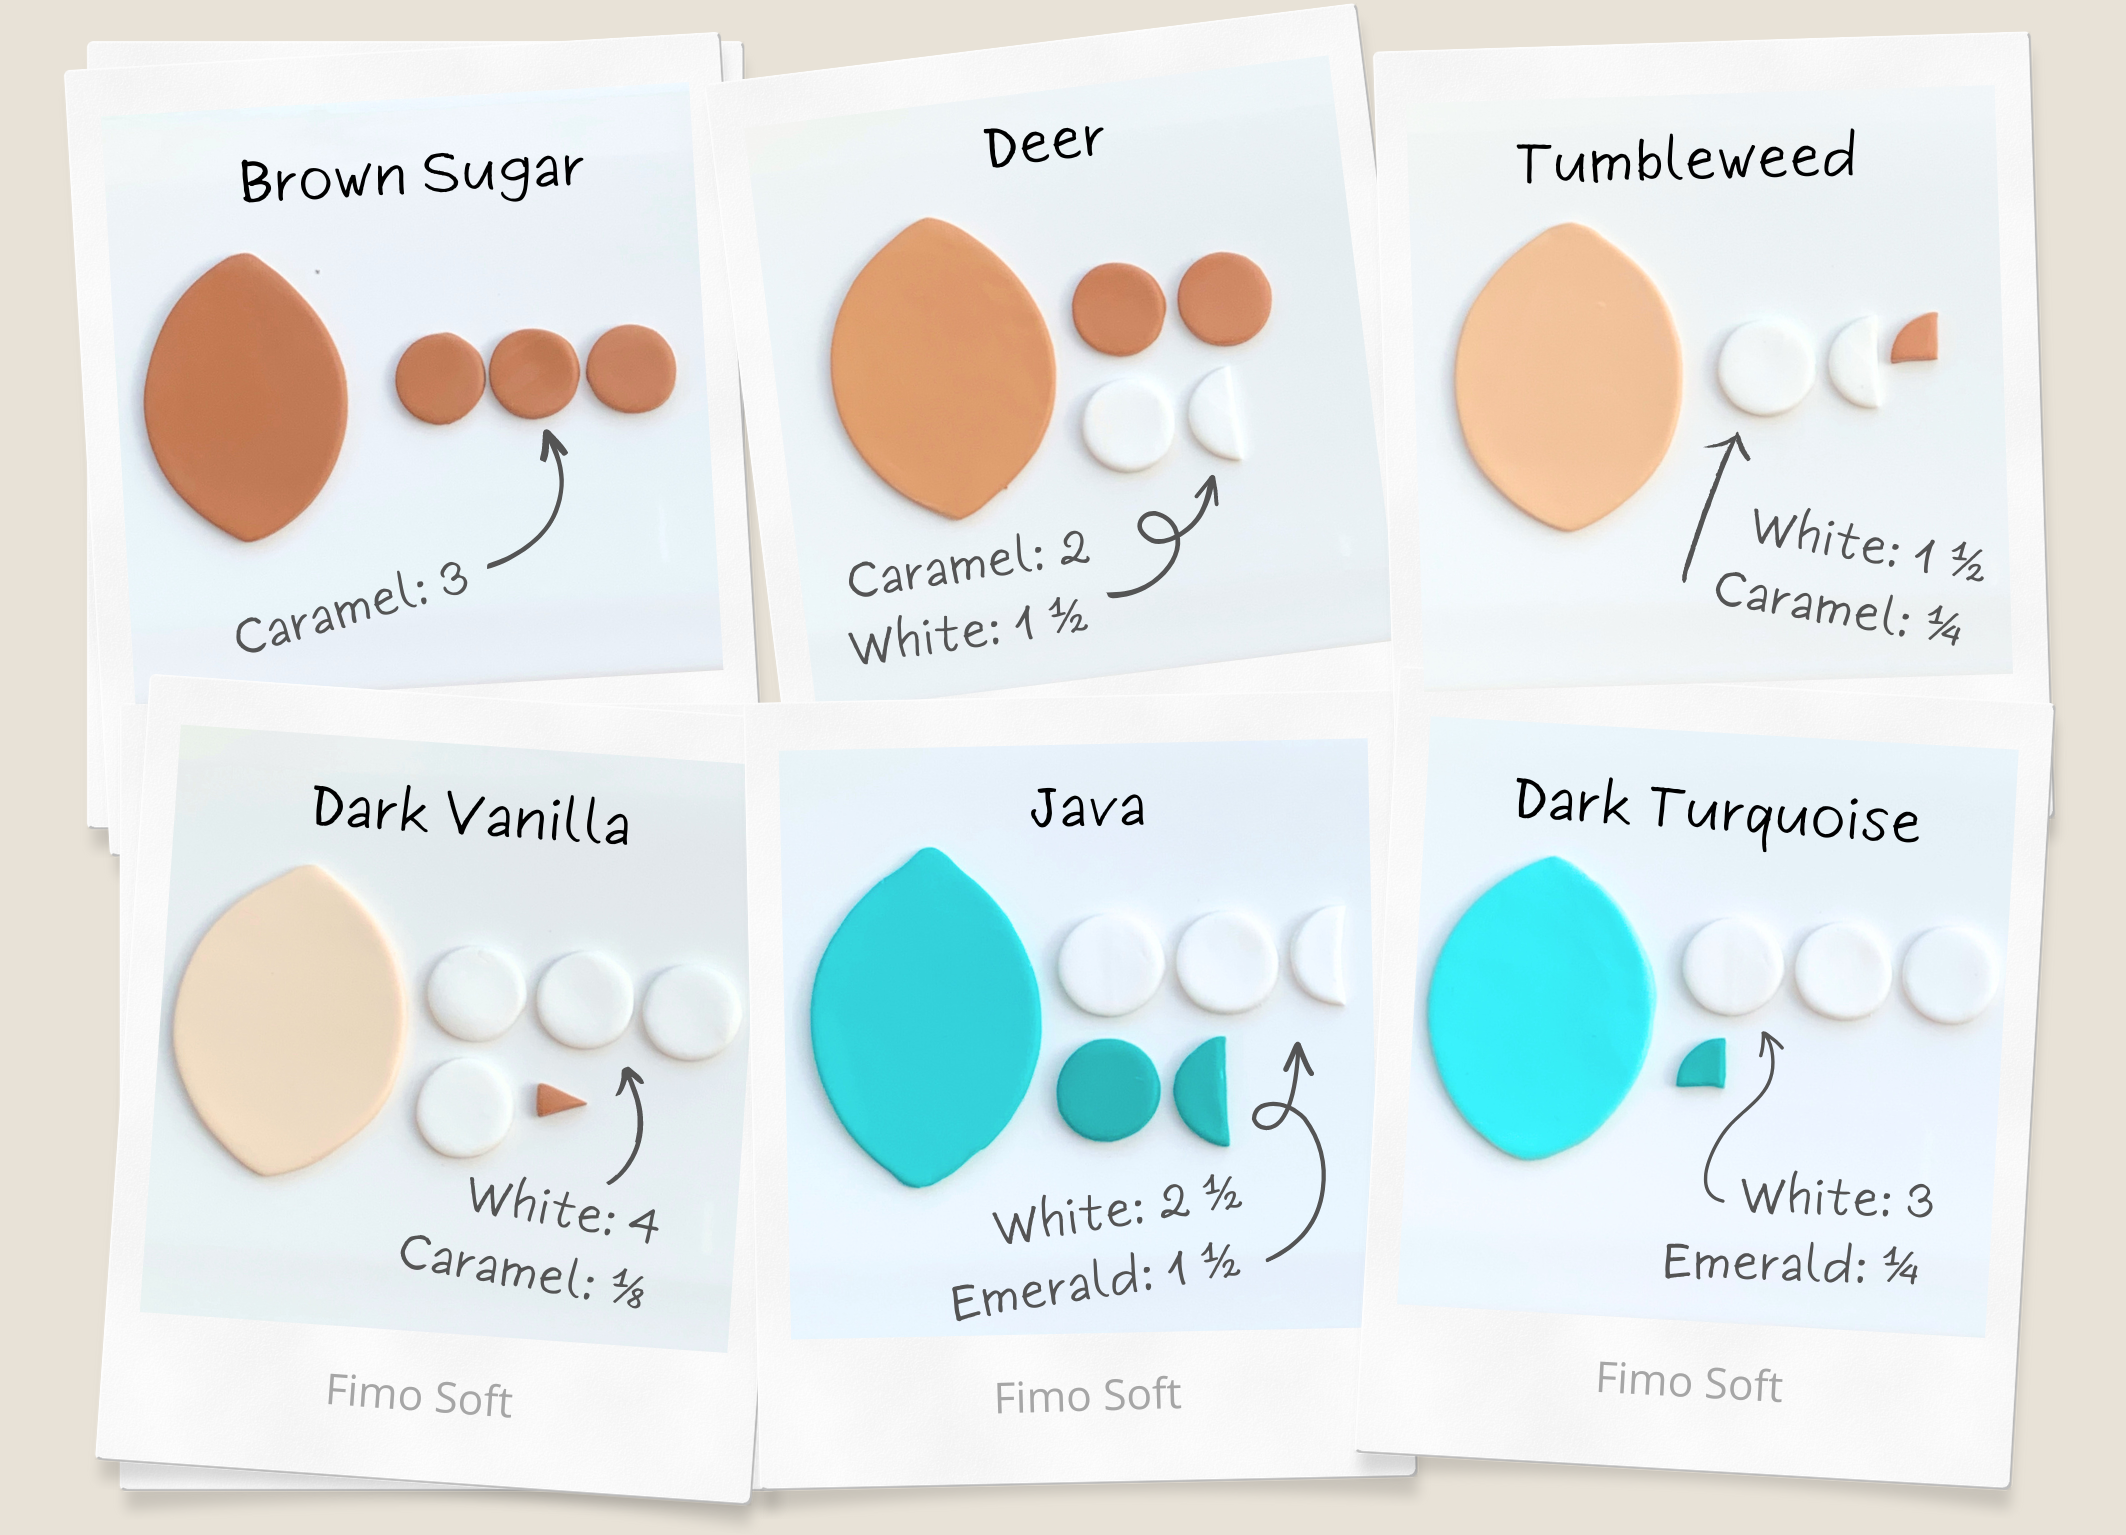
Color Palette
What I love about this set is that all three designs use only three base colors: White, Caramel and Emerald. With them you will be able to create all six colors necessary for these earrings. Use the color palette below and the color references to mix the shades we will need for these creations.
Design #1 — Coastal Treasures
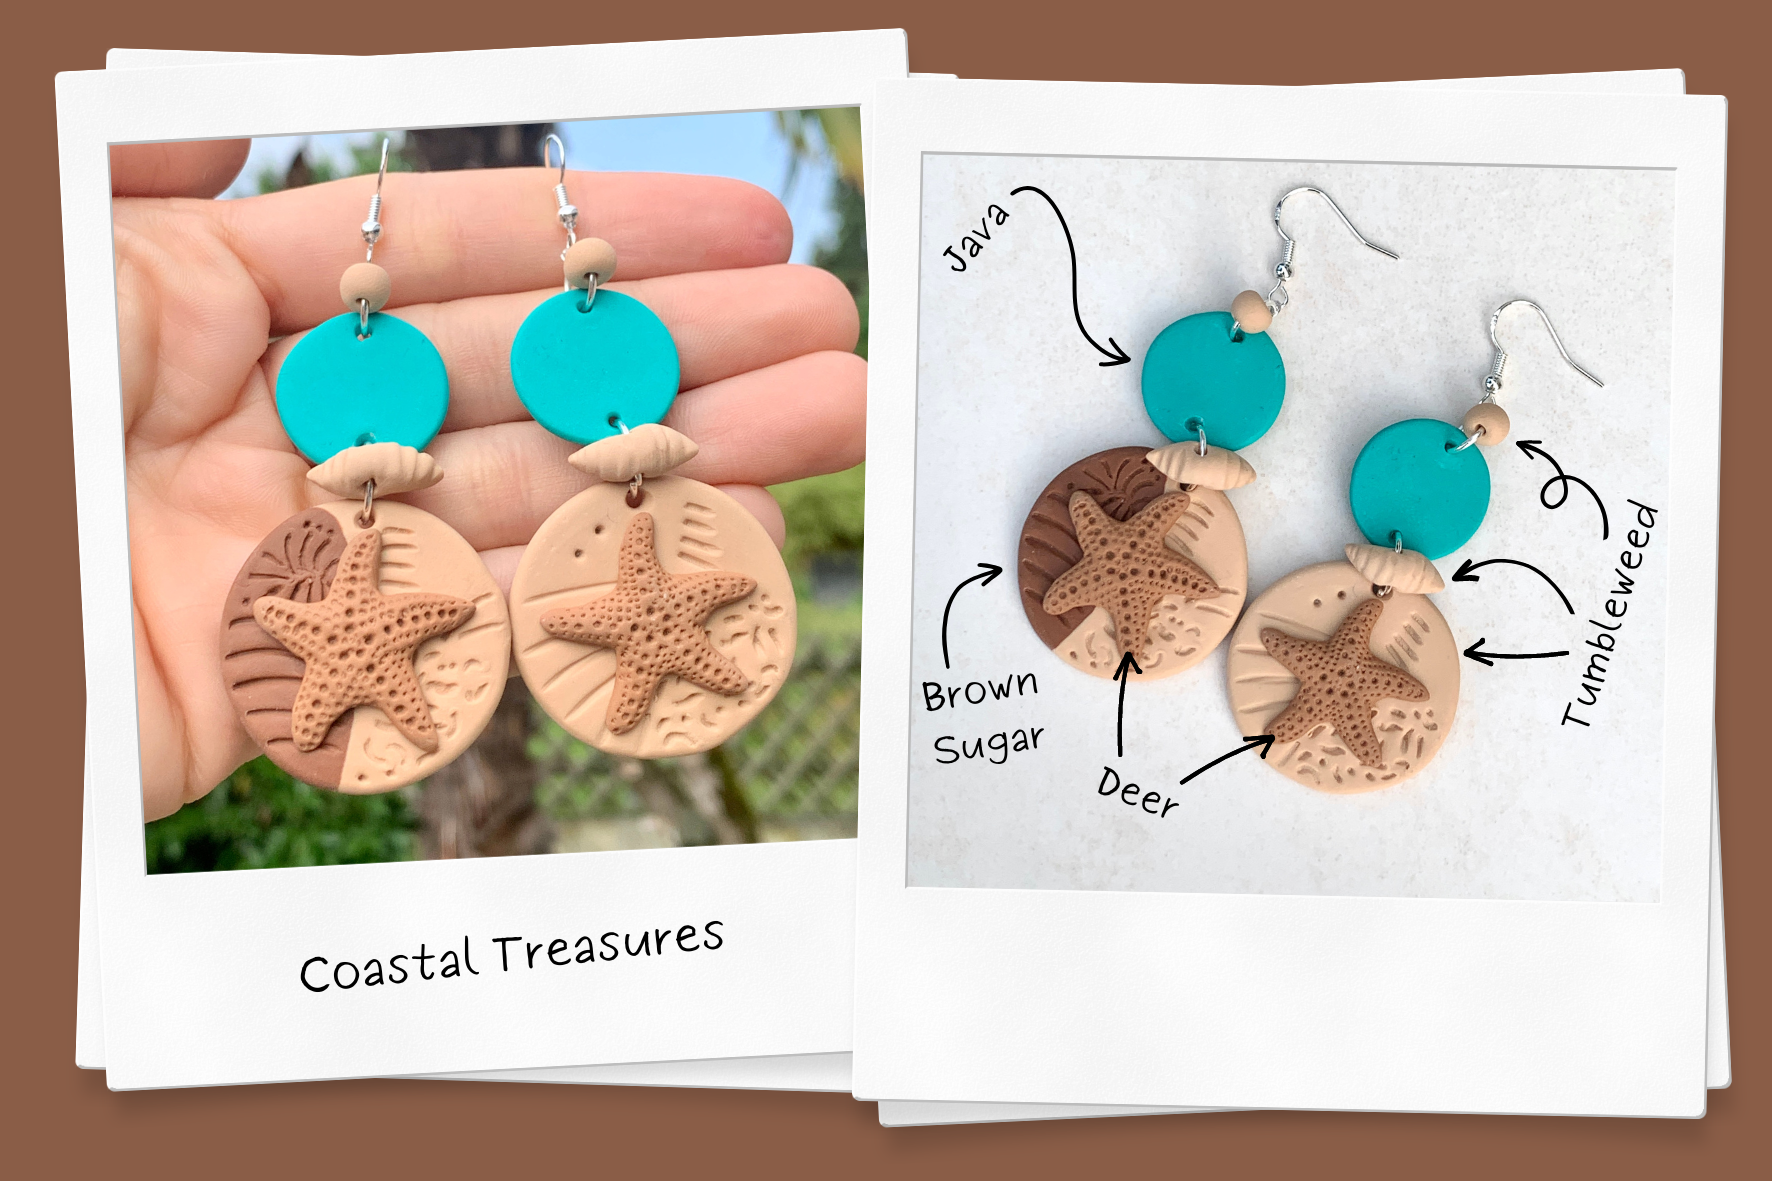
This is definitely my favorite one out of the 3 designs, so let’s start with it. Don’t worry if it feels a bit daunting at first, it is quite simple and really fun to make. You will need to mix 4 different colors for this design:
Java
White: 2 ½
Emerald: 1 ½
Brown Sugar
Carmel only (no need to add any other colors to it)
Deer
Caramel: 2
White: 1 ½
Tumbleweed
White: 1 ½
Caramel: ¼
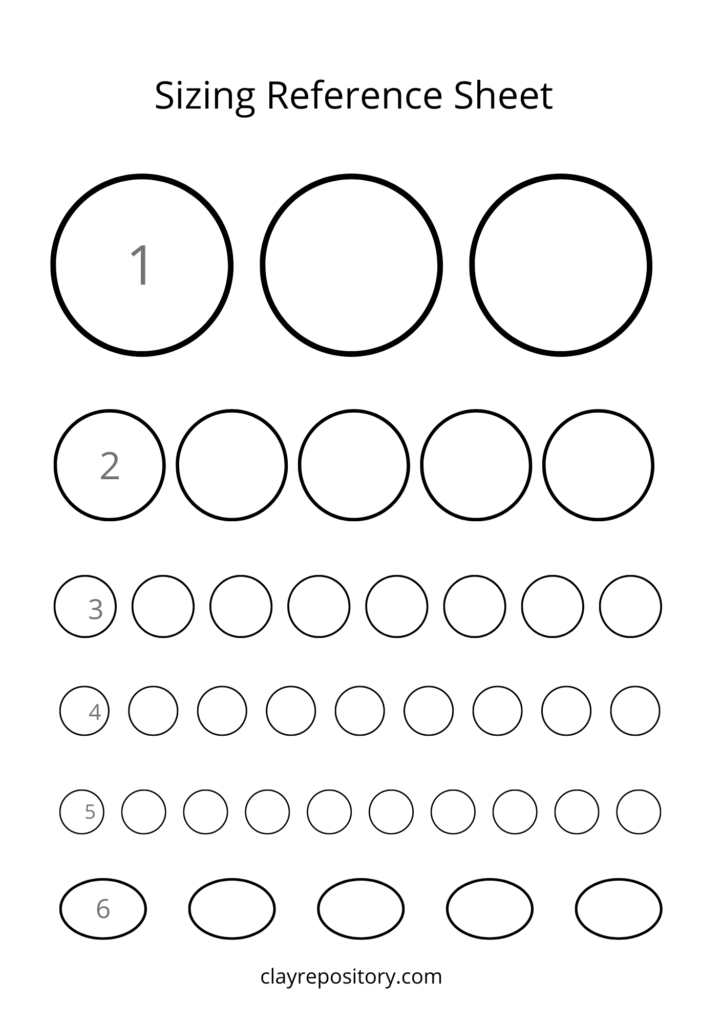
Keep in mind that you don’t need to mix a lot of clay. Start with little, and mix more as needed. Once you have all the colors mixed, is time to start creating the parts. For this you will need the Sizing Reference Sheet you received on your Maker’s Box.
You have enough jewelry components and supplies to make 2 pairs of this design. So you can either make 2 pairs right away, or make one first to get the hang of it, and then make the second with all the expertise you will have gained.
Here are the sizes and quantities you need of each piece:
- 2 small beads, color tumbleweed, using circle 5 on the Sizing Reference Sheet
- 2 flattened circles, color java, using circle 2 on the Sizing Reference Sheet
- 2 shell beads, color tumbleweed, using oval shape 6 on the Sizing Reference Sheet
- 1 flattened circle, color tumbleweed, using circle 1 on the Sizing Reference Sheet
- 1 flattened circle, joining the colors brown sugar and tumbleweed, using circle 1 on the Sizing Reference Sheet
- 2 starfish, color deer, using the silicone mould
In this video you can see the step by step process. Feel free to use your creativity when making the drawings on clay. Just always make sure to keep the drawings at the surface level so you don’t go all the way through to the back of the earrings.
And a tip from a friend: don’t forget to use the tissue paper when flattening the clay otherwise you will end up with clay stuck to both the Reference Sheet and the acrylic plate (not fun, I can guarantee).
As soon as you are done making the designs, take them to the ove (pre-heat it at the temperature indicated on the clay package) and set the timer for the amount of time also shown on the clay package. While the pieces are in the oven, clean all tools and surfaces with the wet wipes or using a cloth with alcohol (or paper towel if you don’t want to have to clean the cloth afterwards). This will avoid clay residue from sticking for all eternity to the tools.
Now it’s time to assemble your piece. As I mentioned before, the process is much easier if you have some jewelry pliers laying around. If you don’t and plan on making more designs in the future, it is worth it investing in some simple and affordable jewelry pliers.
Here is how to assemble this first design starting from the bottom:
- Connect the two circles with the shell bead in between using the 10mm jump ring
- Attach the 3mm jump ring (the smallest one) to the silver hoop
- Put the round bead through the 8mm jump ring and then connect both the java circle to the small jump ring and hoop.
And with that you are all done. You can now proudly wear your Costal Treasures summer earrings to go out and enjoy the sun, or you can just jump into the next design right away.
Design #2 — Seaside Serenity
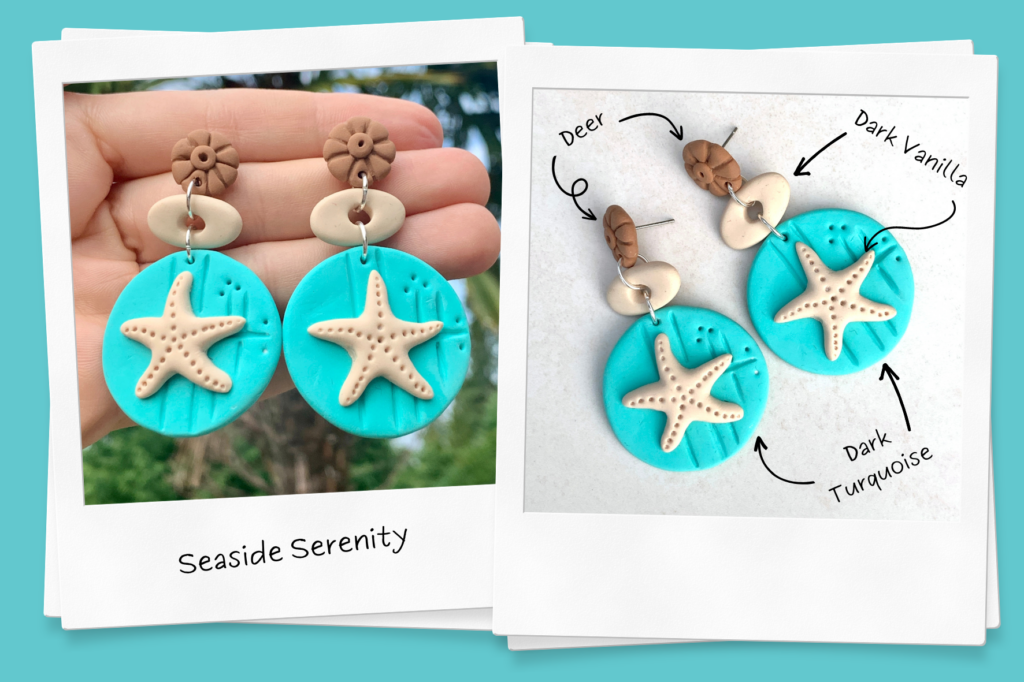
Now that you already made the first design, this one will be so much easier. And, honestly, if you jumped to this one because you were afraid that design #1 is too hard, fear not! You will do just fine!
Here are the colors you will need for this design:
Dark Turquoise
White: 3
Emerald: ¼
Deer
Caramel: 2
White: 1 ½
Dark Vanilla
White: 4
Caramel: ⅛
Once again, there is no need to mix 1 Kg of clay (just kidding) because you will only need a little bit of clay. And once you are finished mixing the colors we can move on to the pieces you need to make for this design. Simply use the Sizing Reference Sheet again for the following pieces and quantities:
- 2 flattened circles, color deer, using circle 3 on the Sizing Reference Sheet (don’t flatten them too thin though)
- 2 oval pieces, color dark vanilla, using oval shape 6 on the Sizing Reference Sheet
- 2 flattened circles, color dark turquoise, using circle 1 on the Sizing Reference Sheet
- 2 starfish, color dark vanilla, using the silicone mould
Watch the video below to see the step-by-step process and what tools to use.
Now, you know the drill. As soon as you are done making the designs, take them to the ove (pre-heat it at the temperature indicated on the clay package) and set the timer for the amount of time also shown on the clay package. While the pieces are in the oven, clean all tools and surfaces with the wet wipes or using a cloth with alcohol (or paper towel if you don’t want to have to clean the cloth afterwards).
Moving on to the assembling part, this one is a breeze: simply attach all 3 pieces using the 8mm jump rings. That’s all!
So, do you need a break now or shall we go straight to the third and final design?
Design #3 — Tropical Tides
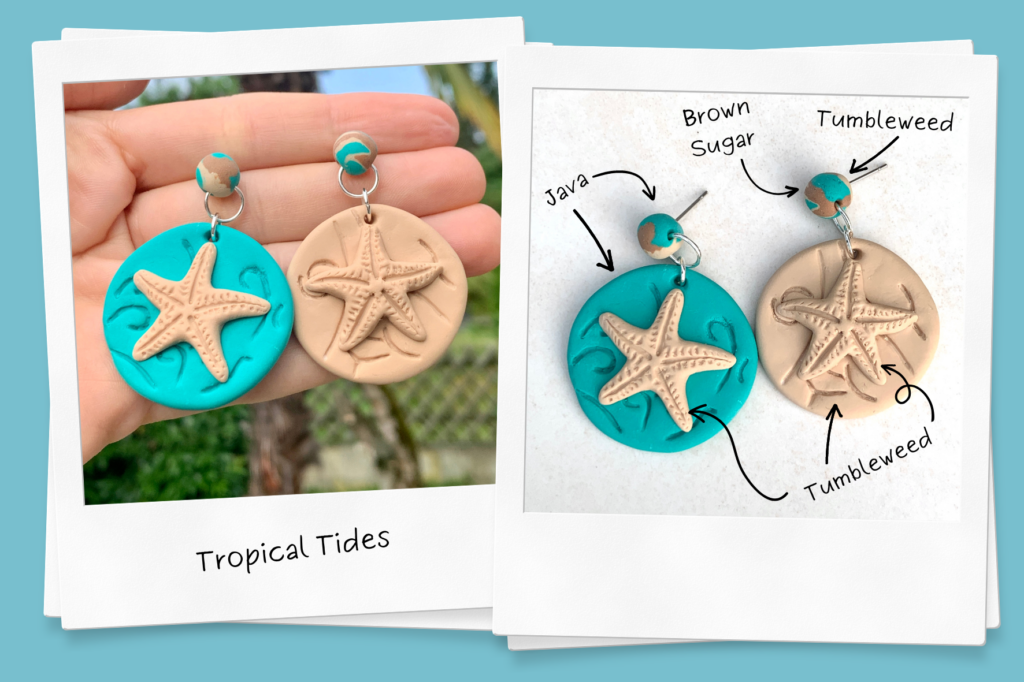
Time for the third and maybe easier design. Is it? Not sure if it is the easier of all three, but it surely gets easier if you already made the other two (which makes you a Pro maker). So here are the colors you will need:
Java
White: 2 ½
Emerald: 1 ½
Brown Sugar
Carmel only (no need to add any other colors to it)
Tumbleweed
White: 1 ½
Caramel: ¼
I’m sure things are much easier already at this point, so let’s pull that Sizing Reference Sheet once again. Here are the pieces and quantities you will need:
- 2 round beads, joining the colors java, brown sugar and tumbleweed together, using circle 4 or 5 (as you wish) on the Sizing Reference Sheet
- 1 flattened circle, color java, using circle 1 on the Sizing Reference Sheet
- 1 flattened circle, color tumbleweed, using circle 1 on the Sizing Reference Sheet
- 2 starfish, color tumbleweed, using the silicone mould
One last time, as soon as you are done making the designs, take them to the ove (pre-heat it at the temperature indicated on the clay package) and set the timer for the amount of time also shown on the clay package. While the pieces are in the oven, clean all tools and surfaces with the wet wipes or using a cloth with alcohol (or paper towel if you don’t want to have to clean the cloth afterwards).
For assembly, simply use the 8mm jump ring to go through the round bead, then use the 6mm jump ring to connect the base to the bead.
Ready for a new challenge? A new Maker’s Box will be released soon and you can always be the first one to know about it by following Clay Repository on Instagram. Please tag @clayrepository when posting your designs. Can’t wait to see your work of art!
Extra Design
Were you about to go back to your other activities? Well, in case you were just looking for an excuse to continue creating, here is another design you can make with the rest of the clay you probably have from the Maker’s Box.
Simply mix a bit more of tumbleweed (color recipe above) and follow the step-by-step in this video:
Ok, now we are officially finished 😀