Are you ready to make some cute floral earrings ever? This edition of the Maker’s box has everything you need to make three gorgeous designs, the only things missing are: some nice and upbeat music to be the soundtrack of your creative process, something refreshing to drink and some jewelry pliers to make the assembling process easier. But don’t worry, if you don’t have any pliers laying around (and don’t want to get some affordable ones on Amazon), you can use normal pliers, a ring opener or open them with your finger. The pliers will be a good investment though if you are planning to give this jewelry making thing a try. Okay, enough of that, let’s move on to the designs!
What you will need
The Maker’s Box already contains pretty much everything you need, but a few more things will be quite useful in the process:
- Wet wipes to clean tools, surfaces and your hands
- Corn starch to smooth the edges of your clay pieces
- A tile or tray with baking paper to take the pieces to the oven
- Jewelry pliers for the assembling part
Here are the things included in your Maker’s Box:
- 3x Fimo Soft packages (Windsor Blue, Raspberry and White)
- 1x acrylic plate
- 1x craft knife
- 1x fabric pouch
- Pictures of all 3 designs
- Color recipes
- 2x wooden sticks
- Tissue paper
- Sizing reference sheets
- All the jewelry components to make 2 earrings of each design
Don’t have a Maker’s Box yet? Click here to get yours.
Color Palette
For these 3 designs you will only need three Fimo Soft base colors: Windsor Blue, Raspberry and White. With them you will be able to create all six colors necessary for these earrings. Use the color palette below and the color recipes listed along each design to mix the shades you will need for these creations.
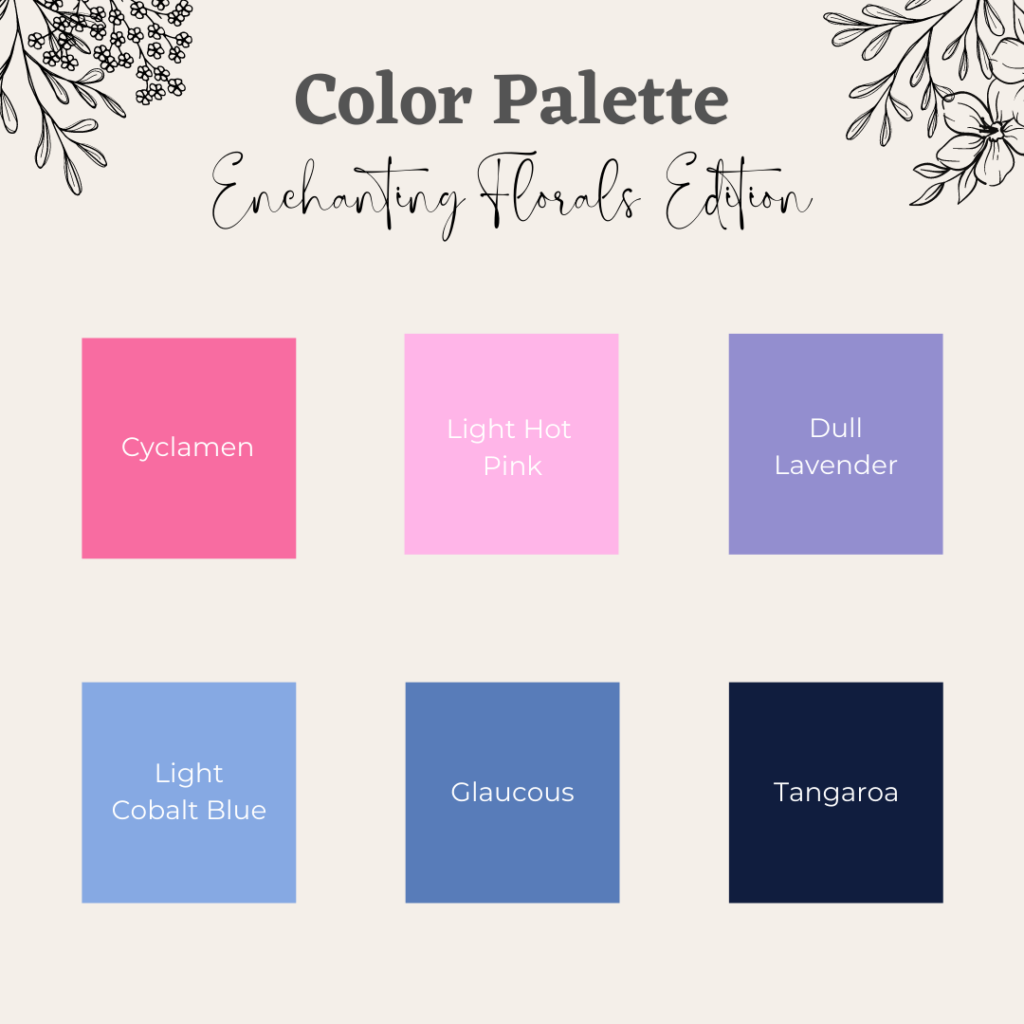
Color mixing is pretty straight forward: simply roll the clay (try to roll always at a similar thickness) and use a circular cutter (or a bottle cap) so you can easily cut fractions of the circle according to the color recipe directions.
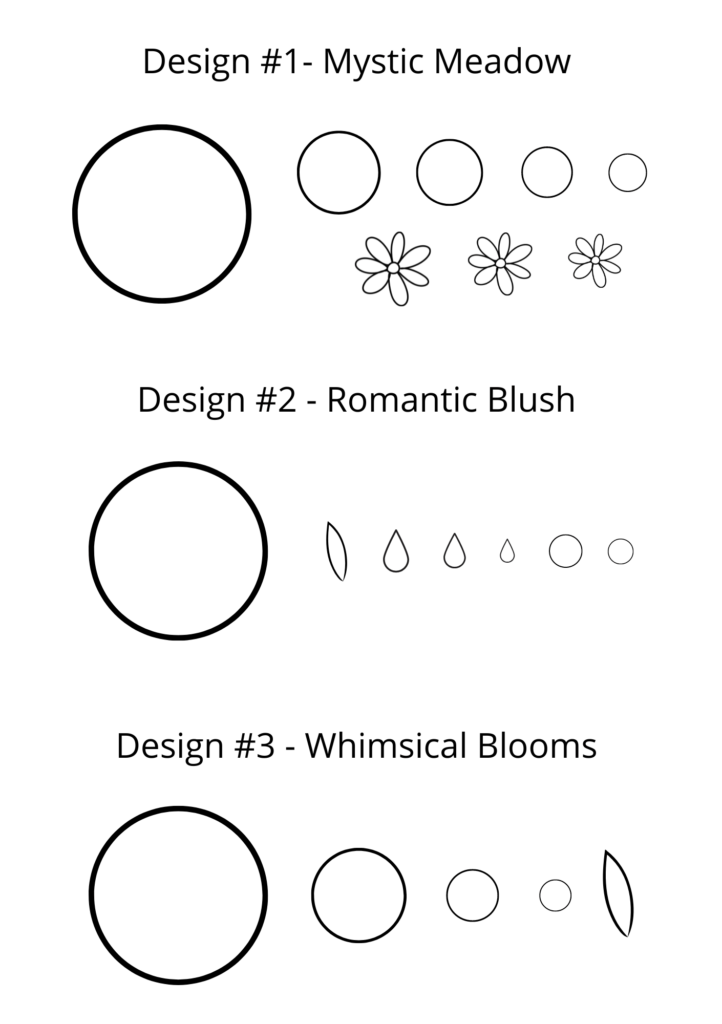
Sizing Reference Sheet
To make things even easier, along with all the supplies you also receive the size reference for each piece of all three designs. This way you don’t have to keep measuring things with a ruler.
Quick tip: print this image as A5 for the correct sizing of the pieces.
Design #1 — Mystic Meadow
Let’s get started with this beautiful mismatching pair. You will need to mix 4 different colors for this design plus use Windsor blue as it is:
Tangaroa
Windsor blue only
Glaucous
Windsor Blue: 1
White: 3
Light Cobalt Blue
Windsor Blue: ¼
White: 3
Cyclamen
Raspberry: 1
White: 1
Light Hot Pink
Raspberry: ½
White: 3
Keep in mind that you don’t need to mix a lot of clay. Start with little, and mix more as needed. Once you have all the colors mixed, is time to start creating the parts. For this you will need the Sizing Reference Sheets you received on your Maker’s Box (the ones on the envelope together with the tissue paper).
You have enough jewelry components and supplies to make 2 pairs of each design. So you can either make 2 pairs right away, or make one first to get the hang of it, and then make the second with all the expertise you will have gained.
Here are the sizes and quantities you need of each piece:
- 2 flattened circles, color Tangaroa, using the large circle on the Sizing Reference Sheet
- Multiple flowers and swirls using the circles and flower size references
In the video below you can see the step by step process. Feel free to use your creativity when making the drawings and details on the clay. Just always make sure to keep the drawings at the surface level so you don’t go all the way through to the back of the earrings.
And a tip from a friend: don’t forget to use the tissue paper when flattening the clay otherwise you will end up with clay stuck to both the Reference Sheet and the acrylic plate (not fun, I can guarantee).
As you can see in the video, this is a creative piece, so feel free to use the elements you like, but also to create your own unique elements for this piece.
As soon as you are done making the designs, take them to the ove (pre-heat it at the temperature indicated on the clay package) and set the timer for the amount of time also shown on the clay package. While the pieces are in the oven, clean all tools and surfaces with the wet wipes or using a cloth with alcohol (or paper towel if you don’t want to have to clean the cloth afterwards). This will avoid clay residue from sticking for all eternity to the tools.
If you prefer you can also make all three designs and then take them to the oven all at once. If you decide to do so, simply put the already sculpted pieces aside and cover them with plastic to protect from dust and lint.
Now it’s time to assemble your piece. As I mentioned before, the process is much easier if you have some jewelry pliers laying around. If you don’t and plan on making more designs in the future, it is worth it investing in some simple and affordable jewelry pliers.
Here is how to assemble this first design:
- Connect the hoops to the earrings by first using the small ring attached to the hoop, and then the larger ring to connect the earring to the small jump ring.
And with that you are all done. You can now take time to celebrate your creative accomplishment, or you can just jump into the next design right away.
Design #2 — Romantic Blush
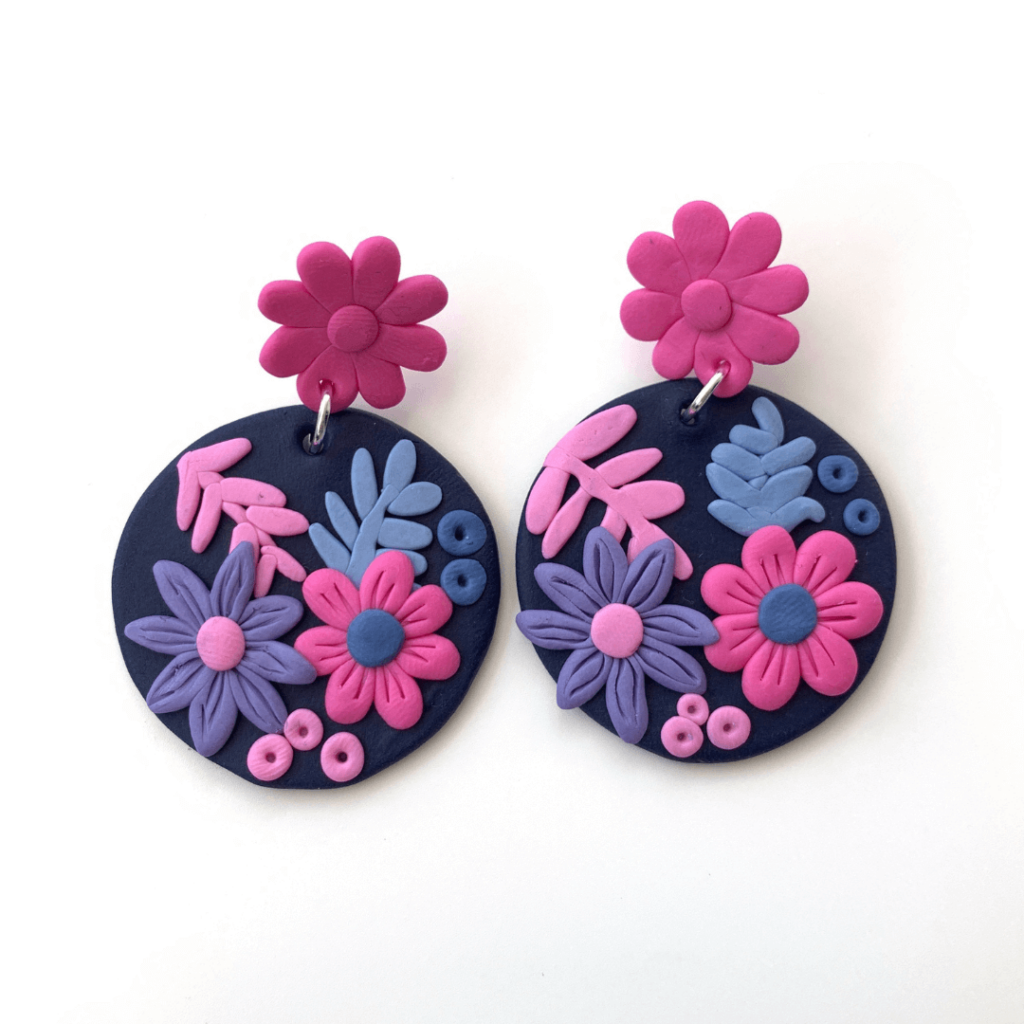
Now that you already made the first design, making a design that repeats the same elements for both pieces will feel quite easy.
Here are the colors you will need for this design:
Tangaroa
Windsor blue only
Glaucous
Windsor Blue: 1
White: 3
Light Cobalt Blue
Windsor Blue: ¼
White: 3
Dull Lavender
Raspberry: ½
Windsor Blue: ¼
White: 3
Cyclamen
Raspberry: 1
White: 1
Light Hot Pink
Raspberry: ½
White: 3
Once again, there is no need to mix a bunch of clay because you will only need a little bit of clay. And once you are finished mixing the colors we can move on to the pieces you need to make for this design. Simply use the Sizing Reference Sheet again for the following pieces and quantities:
- 2 medium flowers for the stud piece, color Cyclamen, using the second biggest petal shape (from left to right) on the Reference Sheet to shape each petal
- 2 large flattened circles, color Tangaroa, using the large circle on the Reference Sheet
- 2 smaller flowers, colors Cyclamen and Dull Lavender, using the 3 petal (from left to right) on the Reference Sheet
- Multiple plants and small circles shaped by hand
Watch the video below to see the step-by-step process:
Now, you know the drill. As soon as you are done making the designs, take them to the ove (pre-heat it at the temperature indicated on the clay package) and set the timer for the amount of time also shown on the clay package. You can use a oven-safe container with rice (or any other grain) as in the video to avoid that the stud pieces lose their shape.
While the pieces are in the oven, clean all tools and surfaces with the wet wipes or using a cloth with alcohol (or paper towel if you don’t want to have to clean the cloth afterwards).
Moving on to the assembling part, this one is a breeze: simply attach the stud flower to the circular piece using the 7mm jump ring. That’s all!
So, do you want to take a break or shall we go straight to the third and final design?
Design #3 — Whimsical Blooms
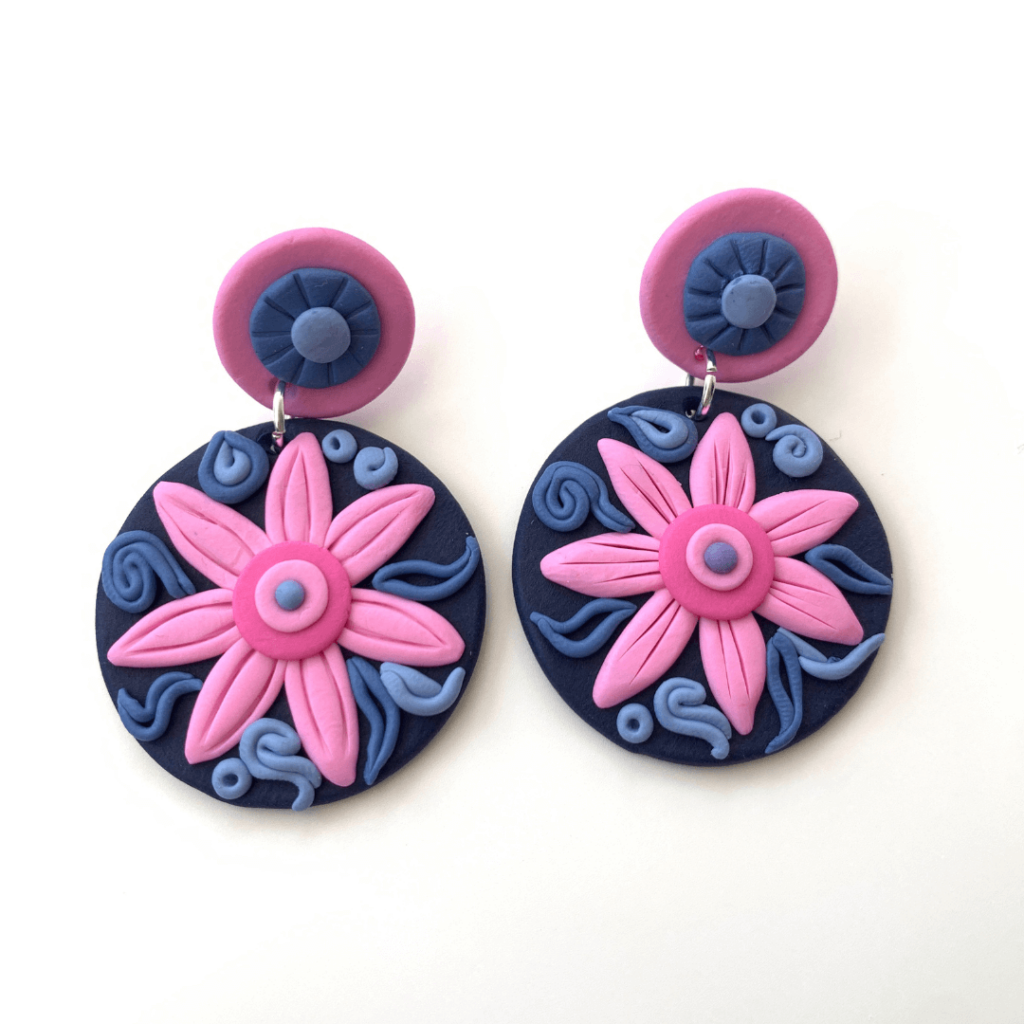
Yay, you made it! It’s now time for the final design and here are the colors you will need:
Tangaroa
Windsor blue only
Glaucous
Windsor Blue: 1
White: 3
Light Cobalt Blue
Windsor Blue: ¼
White: 3
Cyclamen
Raspberry: 1
White: 1
Light Hot Pink
Raspberry: ½
White: 3
I’m sure things are much easier already at this point, so let’s pull up the Sizing Reference Sheet again and make it happen. Here are the pieces and quantities you will need:
- 2 medium circles, color Light Hot Pink, using the middle circle on the Sizing Reference Sheet
- 2 smaller circles, color Glaucous, using the third circle (left to right) on the Sizing Reference Sheet with a small centre, color Light Cobalt Blue
- 2 large flowers, color Light Hot Pink, made using the large petal shape on the Sizing Reference Sheet, with 3 smaller circles at the center, colors Cyclamen, Light Hot Pink and Light Cobalt Blue
- Multiple swirls, colors Glaucous and Light Cobalt Blue
Watch the video below to see how to make this third design:
One last time, as soon as you are done making the designs, take them to the ove (pre-heat it at the temperature indicated on the clay package) and set the timer for the amount of time also shown on the clay package. You can use a oven-safe container with rice (or any other grain) as in the video to avoid that the stud pieces lose their shape.
While the pieces are in the oven, clean all tools and surfaces with the wet wipes or using a cloth with alcohol (or paper towel if you don’t want to have to clean the cloth afterwards).
For assembly, simply use the 7mm jump ring to attach the stud piece to the circular piece. And you are all finished!
Ready for a new challenge? Try the Maker’s Box Starfish edition by clicking here. Be the first one to know about new kits by following Clay Repository on Instagram. Please tag @clayrepository when posting your designs. Can’t wait to see your work of art!
Royalty-free music used in the video tutorials:
Video 1
Music: Let’s Celebrate
Musician: Music_Unlimited
Video 2
Music: Sunny
Musician: @iksonmusic
Video 3
Music: Let’s Celebrate
Musician: Music_Unlimited